18/04/2015 Written by Cyril GRANDJEAN
DDBS Toolkit project is now available as an open source project at ddbstoolkit.cyril-grandjean.fr


DDBS Toolkit project is now available as an open source project at ddbstoolkit.cyril-grandjean.fr

After having studied during the summer, I passed the 1Z0-803 – Java SE 7 Programmer I exam which I succeeded with a percentage of 85 % (77 % was required to pass the Oracle Certified Associate, Java SE 7 Programmer certification).
You will find the program of this certification at this link.
The next step is to succeed the 1Z0-804 – Java SE 7 Programmer II exam in order to become Oracle Certified Professional, Java SE 7 Programmer.
When you are developing a release of a web application, you will very often need to create a testing procedure which will test all the features of your application. Then, you will have to run all the tests manually for each version of your software in order to ensure that no regression has occurred. Functional manual tests are long, boring and can be subject to some human errors.
You can avoid these disadvantages by automating your functional tests using Selenium library. By using Selenium library in Java, you will be able to automate your web browser actions and you will be able to check that these actions will make their expecting behaviour.
We will take example of this basic PHP program:
<?php
session_start();

//We add the element into an array in session
if(isset($_POST['elementToAdd']))
{
	//If the array is already created
	if(is_array($_SESSION['array']))
	{
		//Limit of 10 elements
		if(sizeof($_SESSION['array']) < 10)
		{
			//We add our element
			array_push($_SESSION['array'],$_POST['elementToAdd']);
		}
	}
	else
	{
		//We create a new array
		$_SESSION['array'] = array($_POST['elementToAdd']);
	}
}
//We remove an element from the array in session
else if(isset($_POST['elementToDelete']))
{
	unset($_SESSION['array'][array_search($_POST['elementToDelete'], $_SESSION['array'])]);
}
?>
<html>
<head>
</head>
<body>
	<?php
	//We display the HTML array if there is any element in session
	if(isset($_SESSION['array']) && is_array($_SESSION['array']) && sizeof($_SESSION['array']) > 0)
	{
	?>
		<table>
			<?php
			//We display our elements in session
			foreach ($_SESSION['array'] as $value)
			{
			?>
				<tr class="aRow">
					<td class="rowValue">
						<?php echo $value ?>
					</td>
					<td>
						<form method="post">
							<input type="hidden" name="elementToDelete" value="<?php echo $value ?>" />
							<input type="submit" class="deleteButton" value="Delete element" />
						</form>
					</td>
				</tr>
			<?php
			}
			?>
		</table>
	<?php
	}
	?>

	<form method="post">
		<input name="elementToAdd" type="text" />
		<input id="submitButton" type="submit" value="Add element" />
	</form>
</body>
</html>
You can click here to find the result of this PHP script.
Inside this PHP script, we have a form which we will use in order to add an element into a table stored in session limited to 10 elements only. When an element is added into the array, we can remove it by pressing the remove button.
We will create the following functional tests which we will automate using Selenium:
public class SeleniumClass {

    /**
     * Driver of the web browser
     */
    private WebDriver driver;

    /**
     * Code to execute before any JUnit test
     */
    @Before
    public void setUp() {

        //We instantiate a Firefox driver
        driver = new FirefoxDriver();

        //We set a maximum timeout of 5 seconds
        driver.manage().timeouts().implicitlyWait(5, TimeUnit.SECONDS);
    }

    /**
     * JUnit test for our functional tests
     */
    @Test
    public void testElementPage()
    {
        //We load the page
        driver.get("http://www.cyril-grandjean.co.uk/en/selenium.php");

        //We fill the text field with the name elementToAdd with the value element to add
        driver.findElement(By.name("elementToAdd")).sendKeys("element to add");

        //We click on the button with the id submitButton
        driver.findElement(By.id("submitButton")).click();

        //We check that 1 element with the class name rowValue has been added
        assert driver.findElements(By.className("rowValue")).size() == 1;

        //We check the value of the element in the HTML array
        assert driver.findElement(By.className("rowValue")).getText().equals("element to add");

        //We check the hidden input of the form to delete the element by checking the value attribute
        assert driver.findElement(By.name("elementToDelete")).getAttribute("value").equals("element to add");

        //We remove the element by clicking on the delete button
        driver.findElement(By.className("deleteButton")).click();

        //We check that the element has been removed
        assert driver.findElements(By.className("rowValue")).size() == 0;

        //We will try to add 11 elements
        for(int counterElementAdded = 0; counterElementAdded < 11; counterElementAdded++)
        {
            //We fill the text field with the name elementToAdd with the value element to add
            driver.findElement(By.name("elementToAdd")).sendKeys("element to add");

            //We click on the button with the id submitButton
            driver.findElement(By.id("submitButton")).click();
        }

        //We check that there is still 10 elements
        assert driver.findElements(By.className("rowValue")).size() == 10;

        //We remove the elements by clicking on the delete buttons
        while (driver.findElements(By.className("deleteButton")).size() > 0)
        {
            //We remove the element by clicking on the delete button
            driver.findElements(By.className("deleteButton")).get(0).click();
        }

        //We check that the elements have been removed
        assert driver.findElements(By.className("rowValue")).size() == 0;
    }

    /**
     * Code to execute after each JUnit test
     */
    @After
    public void tearDown() {

        //We quit the driver
        driver.quit();
    }
}
With this JUnit Selenium test, we have been able to automatically tests all the features of our PHP script.
You can find more information about Selenium at this link : http://docs.seleniumhq.org
Abstract
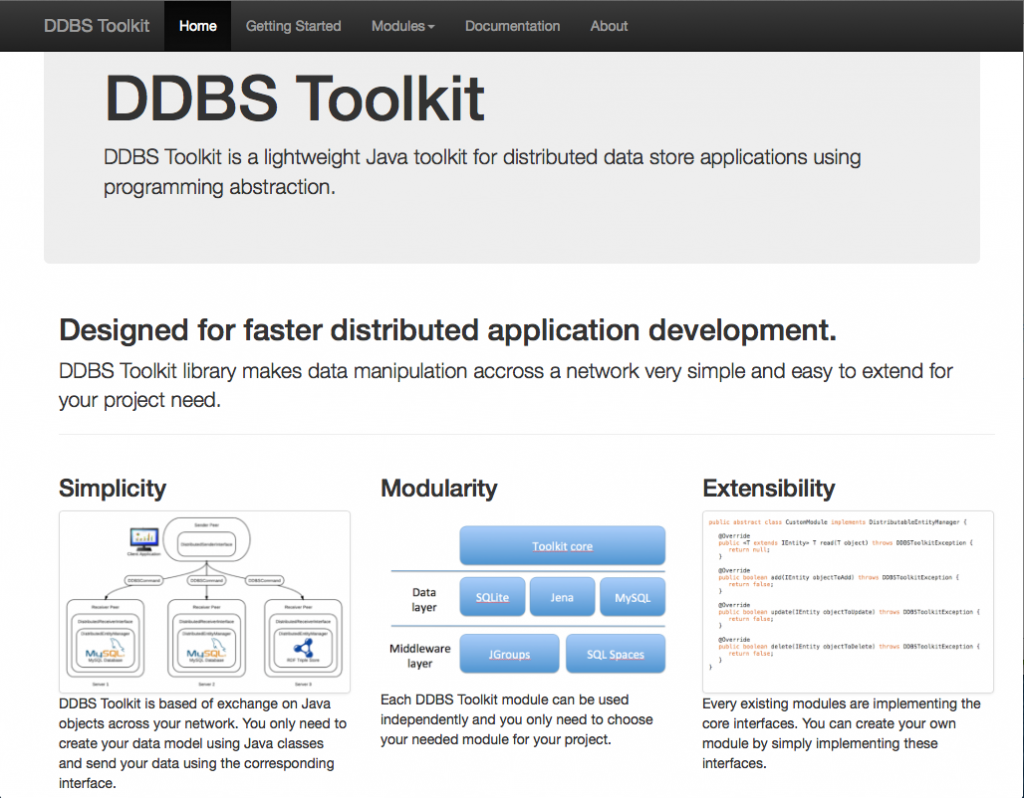
Over the past years, the quantity of data created has increased in a very significant way. Databases and more generally data stores are now installed on servers, desktop computers but also on mobile devices. As a result, distributed data stores technologies have been developed to link these data by using some communication technologies.
In this dissertation, a Java toolkit for creating distributed data stores applications is designed and developed by using Java abstraction mechanisms. Before the development of the toolkit, some middleware technologies are studied in order to establish the communication between the different data stores. At the end of the project, the toolkit is implemented inside a concrete application scenario, that is, a client application which manages several libraries which have their own database.
The toolkit has been created modular with two layers. The first layer is the middleware layer composed of the SQLSpaces and JGroups modules, the middleware technologies that have been selected after the experiments. The second layer is the data layer composed of the MySQL and RDF data stores modules. Transfer transparency between RDF data stores and databases has been implemented and data are transferred between data stores by using command objects representing commands sent to one or many data stores.

Interactions between the different modules of the toolkit
You can find below the full dissertation report.
Here is a small tutorial for all who want to install Apache Tomcat on a QNAP.
First of all, download Java and Apache Tomcat and upload on your NAS.
Below are the paths to install Java and Apache Tomcat that I used :
Then, I have created the file tomcat.sh on the root of tomcat6.
#!/bin/sh #Tomcat self-starting #Auteur : Cyril GRANDJEAN #Description : Self-starting de tomcat #name of the process : tomcat #pid of : /var/run/tomcat.pid RETVAL=0 QPKG_NAME="tomcat6" _exit() { /bin/echo -e "Error: $*" /bin/echo exit 1 } JRE_HOME="/share/Qweb/java6" CATALINA_HOME="/share/Qweb/tomcat6" case $1 in start) sh /share/Qweb/tomcat6/bin/startup.sh ;; stop) sh /share/Qweb/tomcat6/bin/shutdown.sh ;; restart) sh /share/Qweb/tomcat6/bin/shutdown.sh sh /share/Qweb/tomcat6/bin/startup.sh ;; *) echo "Usage: $0 {start|stop|restart}" exit 1 esac exit $RETVALThen, to use it as a package on the interface of the QNAP, I have used the following commands :
echo "[tomcat6]" >> /etc/config/qpkg.conf echo "Name = Tomcat6" >> /etc/config/qpkg.conf echo "Version = 6.0" >> /etc/config/qpkg.conf echo "Enable = TRUE" >> /etc/config/qpkg.conf echo "Shell = /share/Qweb/tomcat6/tomcat.sh" >> /etc/config/qpkg.confYou can now use Apache Tomcat on your QNAP.

During my internship at Distrame from July 2010 to September 2011, I have participated to the creation of the solution Efficacenergie. This solution, directly installed on the intranet network of the customer, allows the measure of energy consumption of a building such as water consumption, gas, electricity or the measure of temperature, … Efficacenergie is compatible with the wireless sensors of the brands LEM and Coronis.

The solution is installed on a NAS working on a linux operating system. Our NAS server is going to play collector’s role of data resulting from wireless sensors. Thanks to the application server Apache Tomcat and a mySQL database, the customer can visualize his consumptions with an ergonomic Web interface developed from the javascript framework Ext-JS. You can find on my portfolio a list of available features with Efficacenergie.
Here is a small video of presentation of the solution (French video) :